1 / 3
AWAN Cloud Chamber
2 / 3
(left) Alpha tracks from Uranitite (right) Alpha tracks from Americium-241
3 / 3
Vacuum Test of AWAN

Showing posts with label Construct AWAN. Show all posts

Monday, 29 June 2020

AWAN - Cloud Chamber Mark I

BACKGROUND

AWAN is my first cloud chamber assembly. The chamber itself is commercially available and were "upgraded" by fitting it with a small diaphragm vacuum pump, a simple homemade high voltage source, and a lamp to provide all basic necessities to operate an expansion cloud chamber without the physical strain of keeping all parts stationary during expansion cycles.  

The primary objectives of AWAN was:
  1. A test if building a decent cloud chamber within DIY budget is possible. (ACHIEVED)
  2. To show that expansion cloud chamber can be operated without hand-powered pumps. (ACHIEVED)
  3. To show decent photography of particle tracks are achievable and measurable through optimisation with expansion type cloud chambers.
The secondary objectives of AWAN are:
  1. To replicate the observation of alpha particle scattering collisions by P. M. S. Blackett.
  2. To replicate the observation of the first nuclear transmutation, also by P. M. S. Blackett. 


UNIQUE FEATURE

  1. Able to adjust ion-clearing voltage.
  2. Able to change types of gases as target.


SPECIFICATIONS

Type: Expansion Cloud Chamber (Wilson's design)
Completion: May 2020

Sensitive Area: 63.6 cm² (90 mm diameter)
Sensitive Depth: 2 cm
Sensitive Volume: 127.2 cm³

Ion Sweep Field Voltage: 500 V to 1000 V, adjustable
Lighting: CREE LED lamp, fixed position
Magnetic system: No. Variety of small NdFeB magnets less than 10 mm thickness
Vacuum system: 12 V membrane vacuum pump @ ~12 L/min (6 mm tube connector)

Operating pressure: -60 to -65 cmHg
Valve type: Manual press-valve

Operating Voltage: 12 VDC
Operating Current: 0.13 A nominal (auxiliary ventilation)
                               0.28 A with lamp
                               1.30 A with lamp and pump
                               1.74 A with lamp, pump, and sweep field voltage at maximum


GALLERY

Overall box design of AWAN assembly. The device is powered by 12 VDC; the rear end shows the auxiliary ventilating fan and an exhaust port from the built-in vacuum pump.

Control panel of AWAN assembly. The valve is operated manually.


Wednesday, 24 June 2020

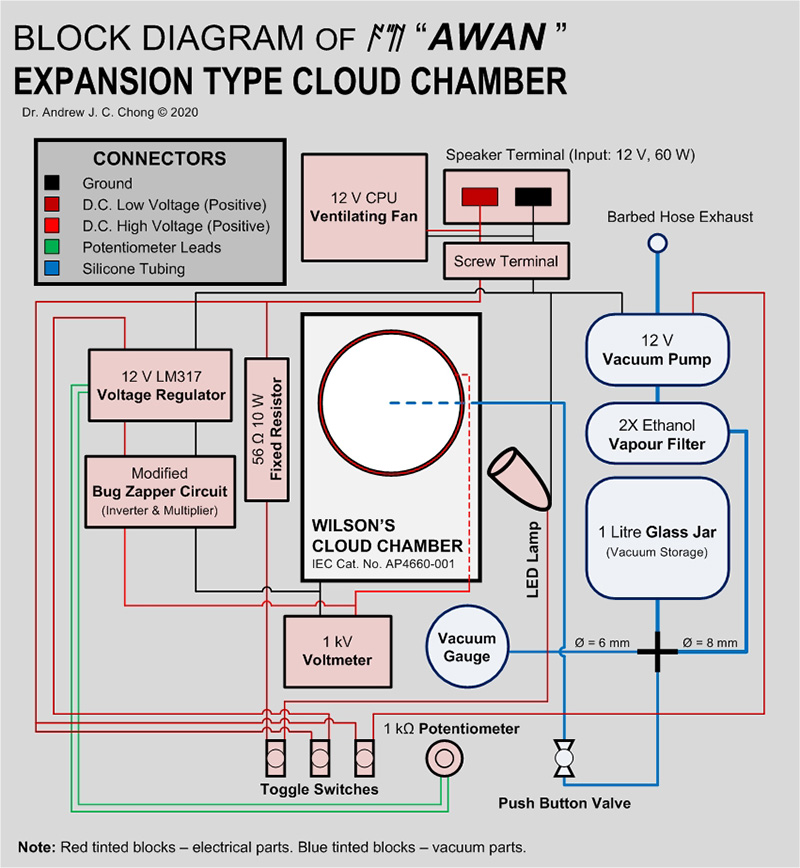
Schematics of AWAN

The following is a detailed schematic of AWAN cloud chamber assembly.


Photographs and specifications of finished assembly are available here. The entire assembly was modular, so not much testing was needed prior installation into the "black box". It is really more of electrical wiring than electronics. (wiring are shown in the schematics above). I now give a quick description of the vacuum system before going into the electrical part 


A Vacuum System that Weans Off the Function of a Reverse Bicycle Tyre Pump

Earlier I had found sudden drop in pressure was able to achieve the same effect as volume expansion in this Wilson's cloud chamber. I used a homemade vacuum tank to store up a vacuum "charge"; a normally closed press-valve is connected directly from the tank to the chamber. 

Testing the feasibility of "vacuum charge" using a diaphragm pump and a homemade PVC vacuum tank (the white one with gauge) to get rid of the manual bicycle pump. The setup here also shows the dedicated 1.2 kV DC power supply used as ion sweep field. The lighting was a "bedside reading LED lamp" that eventually became part of AWAN.

When the valve was pressed, the flow of gas from the chamber to the vacuum tank was able to reduce the pressure in the chamber fast enough (adiabatic) to achieve supersaturation with baric difference as low as -30 cmHg provided the inside of the chamber was pre-saturated with pure isopropyl alcohol. This was good news because I no longer have to depend on the reverse bicycle pump to achieve supersaturation. 

During assembly, I included two ethanol vapour filters installed in series between the pump and the vacuum tank to avoid damage on the pump in prolonged operation. Even though the vapour of isopropyl alcohol (2-propanol) isn't acidic, I hope the addition of the filter might make AWAN last longer. Less servicing means more productivity. 

Other safety features involving the vacuum system is that I have drilled air holes on the bottom of the box to provide ventilation, also an addition to the vacuum pump an exhaust vent so that the vapour can get out from the box directly instead of being trapped inside (together with high voltage circuit could potentially lead of explosive disaster in the event of a spark discharge).    

The most important part during this assembly was figuring out the order of installation.


Commercially Bought Expansion Type Cloud Chamber

About a month ago, I finally completed the construction of a cloud chamber. To be honest, it is actually less of "building", and more like "assembling" because the main part is available commercially. It started in 2014, when I bought a Wilson's Cloud Chamber from an Australian scientific instrument supplier for education: Industrial Equipment and Control Pte. Ltd, or (IEC).

The exact catalog link is here and screenshot are as below:


Here is the list of materials inside the package when it arrived:
  1. Cloud Chamber (presumably the most expensive part)
  2. A reverse bicycle pump, (sucks air when you pull the piston)
  3. A plastic bottle for collection of radon gas
  4. Some silicone tubing to connect the pump to the chamber, d = 6 mm
  5. A Mohr clip, act as a valve to prevent turbulence if you use the plastic bottle to feed radon gas into the chamber. (as shown in photo)
  6. An aluminum vertical stand
  7. An instruction on how to use them is available on their website, here

It costs a whopping 400 AUD then (I was a postgraduate student then) so I guess I was really desperate to try out the technology. Yet, despite the cost, I didn't make full use of it since purchase. I tested it yes, it worked perfectly fine, but suffers some minor drawbacks.

For a simple operation test, you will need:
  1. The chamber
  2. The pump
  3. The silicone tubing
  4. 2-propanol (isopropanol) or ethanol (ethyl alcohol)
  5. A high voltage source (this is absolutely necessary)
  6. A strong source of light, actually a cellphone flash in continuous operation will do.
  7. An alpha radiation source. Easiest to get is Am-241 from smoke detectors.  

METHOD
  1. Connect the pump to the chamber through the silicone tube.
  2. Clean all internal surfaces with damp, lens paper. (so it doesn't leave paper fibers) 
  3. Place the Am-241 inside the chamber. 
  4. Wet the bottom of the chamber with said alcohol. (use a dropper)
  5. Seal the chamber. 
  6. Connect a high voltage source. You can literally use the voltage generated by an electric mosquito swatter (tested, OK). I used a small dedicated 1.5 kV lab power supply then.
  7. Pull the valve of the pump. 

This was what I got.

It works well even when the chamber was dusty. The banana plug on 5 o'clock position was annoying. It reduces observation space but the plug is necessary because it connects the high voltage supply to the circular wire on top of the chamber to provide an ion sweep electric-field. 

The alpha tracks were crisp clear if you give an appropriate voltage to sweep away "old" ions, and running the experiment in an environment not exceeding 25 C°. In fact I find the tracks were much clearer and sharper than diffusion type cloud chambers seen so often in YouTube. This is one and perhaps the best advantage of the expansion type cloud chamber.

Absolutely amazed by the result; but like I said, this configuration suffered some serious setbacks:

  • The set up is extremely "mobile", it is nigh impossible to take photos without blurring due to all the vigorous motion. The silicone tube was too short so whenever I pulled the valve, the chamber will most certainly move or shake.
  • The lighting has to be aligned to the area where the tracks appear. It has to be very bright and "point like" with respect to the chamber. The issue above makes this difficult.
  • More importantly, your hands get tired after the 20-th pull. It is difficult to focus on keeping the setup stable and observe the tracks simultaneously. Besides, you only get to see a glimpse of the tracks during each pull, and it never lasts more than a fraction of a second.
  • You can, use a video camera to record your findings during each pull, but the FPS of my camera was low then, and I would need to review the videos frame-by-frame. Rather tedious. 
The conclusion was: if I want to take quality photos of whatever tracks emerging in this chamber, I need to put it on a steady box, inside the box contains all the systems needed to keep the chamber working. In the end, I would be operating the chamber by pressing a button instead of pulling the piston. 

This chamber was kept for a long while until mid 2019, when I had the chance to use my father's workshop; and finally completed during peak COVID pandemic in 2020 when I had the time to work out the installations.